
List of Contents
Easy Step By Step Guide to Install WordPress
WordPress is probably the most popular and successful blogging platform and easy to install content management system (CMS). It is an open source website creation system works with PHP and MySQL.
Read More: How to Gauranteed Earn Money Online in 2020?
To use this website creation tool, You have to install WordPress on your internet hosting service or on your network host itself.
Mostly WordPress web hosting companies give the feature to install WordPress within few clicks. In this article, I am trying to elaborate all aspects on how to install WordPress with easy steps.
Things You Should Remember Before Installing WordPress
Before starting the WordPress installation, You should keep some important points the remember.
You should have your domain name and good web hosting provider who gives WordPress installation.
We want to especially recommend you Bluehost to buy hosting or domain name for your website.
It will be a great deal for you because they are offering 50% discount on web hosting and a free domain. WordPress is also an official partner of Bluehost.
Because of long description in this tutorial, Please use the headings below to meet your requirements.
- How to install WordPress on Bluehost using Fantastico
- Then How to install WordPress on Hostgator using QuickInstall
- How to Install WordPress on Inhosting Using Softaculous
- How to Install WordPress Using FTP
Easy Steps to Install WordPress on Bluehost Using Fantastico
Fantastico is a type of installer of web applications of a website. Some common WordPress hosting companies use this auto-installer script.
It offers an easy method to install web apps to a website e.g., WordPress.
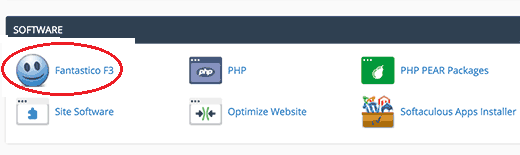
First, you need to go Bluehost homepage and log in there to access cpanel dashboard. scroll down the page, And you will find software section there, And now you will see there is an icon Fantastico.
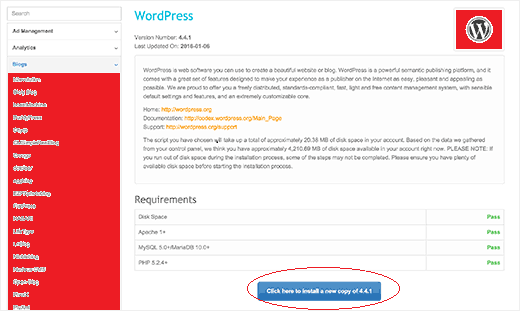
Click on the Fantastico icon and you will see the new page. Here You will find a list of web applications. You should click on blogs and finally you will see WordPress there among many other web apps.
Click on WordPress and you will see there is an option ‘Click here to install WordPress’. click on that button.
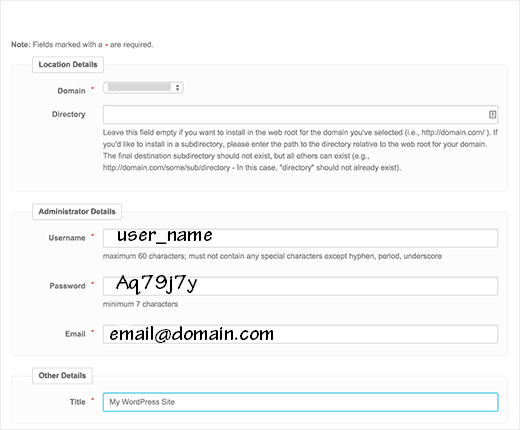
Now you will see another page, where you will have to fill up a simple form about you and your website. Then click the submit button to go ahead.
Finally, you have installed WordPress with the help of fantastico installer. Now you will get a success message after installation.
After complete installation, you can access easily WordPress dashboard. In your web browser, enter domainname.com/wp-admin in URL box and click enter.
Now fill up your username and password which you have created at the time of WordPress installation. On next page, you will see admin panel of WordPress.
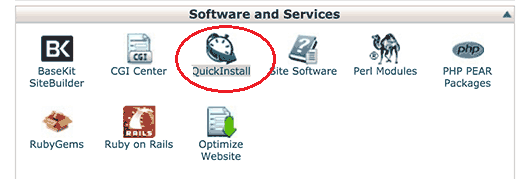
How to Install WordPress on Hostgator Using QuickInstall
QuickInstall is also a famous web app installer. Hostgator and many more famous hosting companies use this auto installer.
Go to Hostagator.com and log in with your account information. Find out services and software section, then select QuickInstall.
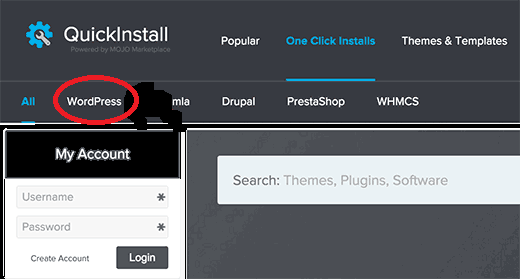
Now on the QuickInstall page, You will find a lot of apps. You will select WordPress and then you will see the overview page about WordPress. Choose the Install WordPress button there.
It will take you to the WordPress install page, Select where you want to install Wordpress, into your sub-directory (yourdomain.com/blog) or if you want to install in the root directory, then leave this field blank (like yourdomain.com).
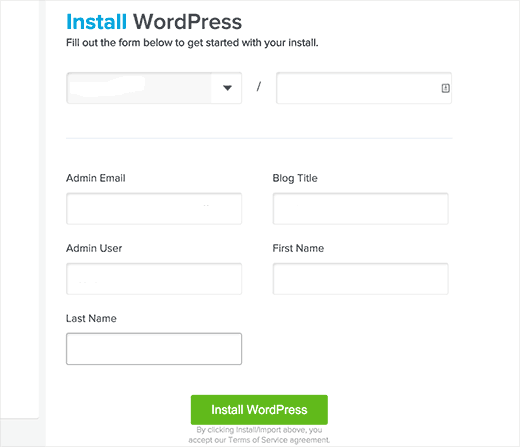
You will have to select a title for your site and after that, you have to choose a username, password and email address for your WordPress admin panel.
(note: keep remember your username and password for future login). After filling out all the important information, you can select there Install WordPress again.
Now QuickInstall has installed WordPress on your website. After success message, you can go back.
How to Install WordPress on InMotion Hosting Using Softaculous
Softaculous is very easy to use the auto installer of web applications. By this auto installer, You can install WordPress with just click setup.
Big hosting companies like InMotion Hosting and many others use softaculous to install WordPress.
![]()
First, you have to login into your Inmotion cpanel account. In the section Auto Installer looks for the WordPress icon and click on it.
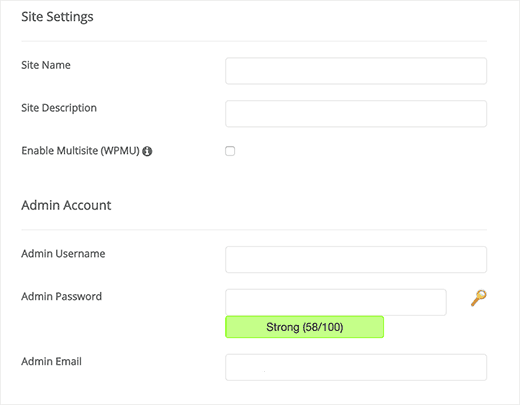
Now you will see an overview page about WordPress. You have to select install button there. Now it will ask you to where to install WordPress.
Leave this field is blank and go ahead. Now fill out the form here. choose your site title, username, password and email address. Please keep remembering your username and passwords.
Don’t worry, you can change these settings whenever you want. After the completion of form filling work, you can click on install button to start the installation.
Now Softculous will start the installing process, wait for a while until the process is completed.
Now Softculous will start the installing process, wait for a while until the process is completed.
How to Install WordPress with the Help of FTP client
FTP is the most popular secure method to installing WordPress. You need an FTP software for this installation on your computer.
Filezilla is the best software for this type of WordPress installation, download this and run on your computer.
Now the first thing you need to visit WordPress.org and click on download WordPress at the top right corner. It will be a zip file folder.
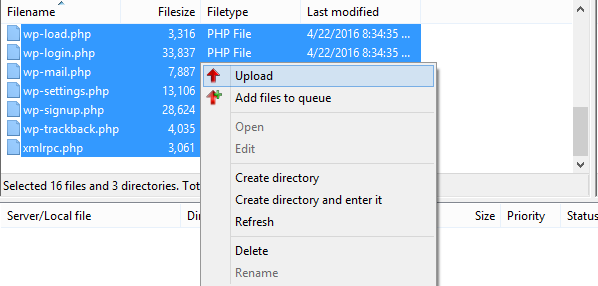
After downloading, You need to unzip this file. after extracting the files, you will get multiple files in that folder (e.g., wp-admin, wp-content, wp-includes), Copy all these files and upload in FileZilla into your web host directory.
Now you need to choose wheather you want to upload WordPress into your root directory (like yourdomain.com) or sub-folder directory (like yourdomain.com/blog).
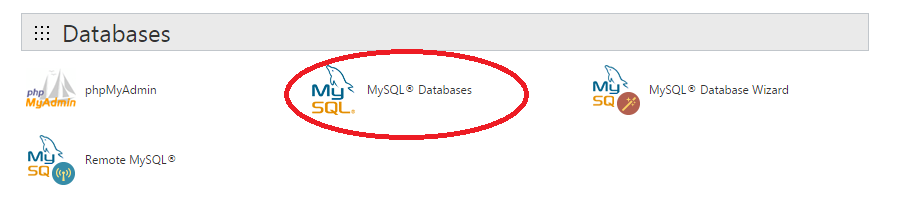
After successfully uploading WordPress, you need to create a database to connect with FTP client. Now go to your website hosting cpanel and find the option My SQL Databases.
Click on this and create a new username and password for your new database. Note out all this information will need it later.
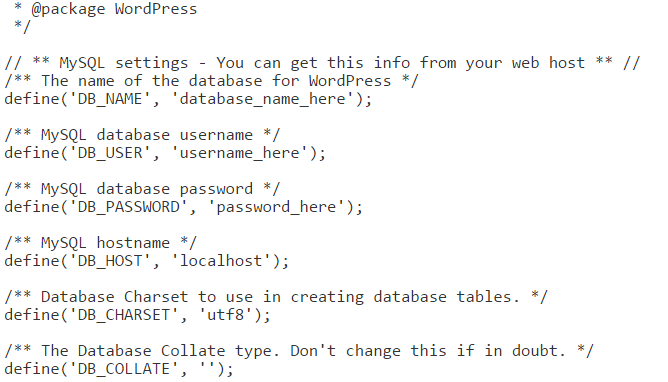
Now go to your website cpanel and open the file manager, Here you need to change your just create database username and password in the wp-config file.
You can also create a copy of wp-config-sample.php and rename this file name to wp-config.php. Now edit this new file and change the database name, database host, username and password there. You can see screenshot below for more help.
Now you have done almost everything to install WordPress. Just only set the last settings and your site will go live in just a few moments.
Just visit http://yourdomain.com/wp-admin/install.php. (replace your website name with yourdomain).
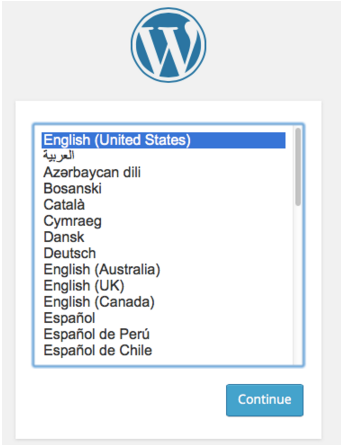
Now select the language, create a username, password and set email id to setup WordPress. Please ensure to create a difficult password but easy to remember. Now after complete setup.
Just visit yoursite.com/wp-admin and enter just created username and password. Now you have just got your WordPress admin dashboard, You can easily create pages and add posts to your recently started blog from here. You have whole control of your site from this dashboard.
Conclusion
We hope this article taught you easily WordPress installation guide. Nowadays, Most hosting companies give easy script to install WordPress.
We would like to suggest you to choose script installing more better than FTP installation. Because it is more complex for beginners.
If you liked this article, Kindly share this article with your friends. If you like to get more articles like this, just subscribe our newsletter.
")


Thank you for the tutorial. It really helps to install WordPress with step by step process and the article defines the same for beginners.
THANKS FOR WRITTING I CAME TO KNOW A LOT BY YOUR ARTICLE KEEP WRITTING SUCH ARTICLES